Same shot.
Eight ways to light it.
See what each setup does to a face, learn where to put the source, then use that thinking on set or in an AI relight.
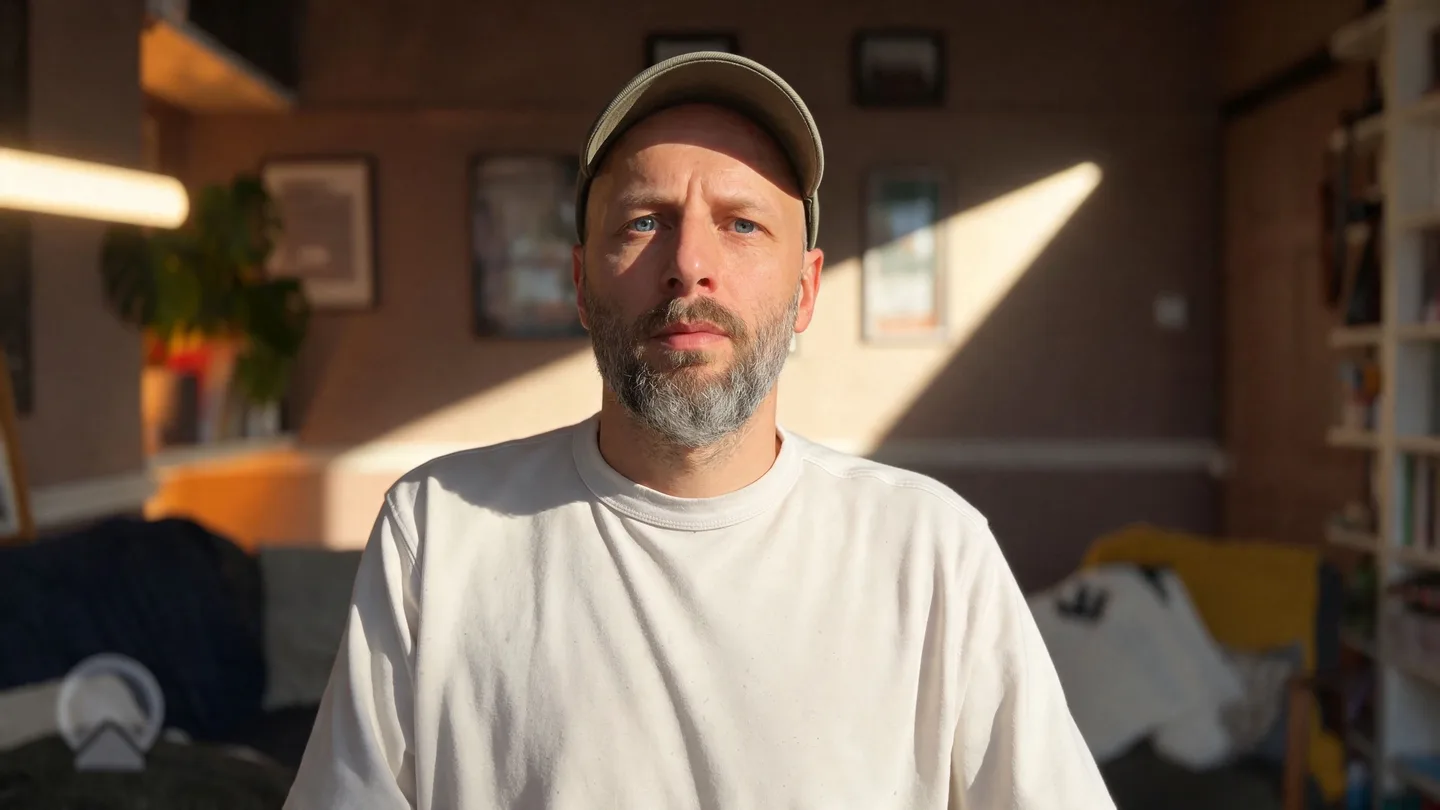 Hard light
Small source / defined shadow edges
Hard light
The cap brim, nose and chin cast clear shadows. A slash of light on the wall makes the source direction visible across the room.
- Place the source
- A small, undiffused key just above eye level and slightly camera right. Use flags to shape the spill on the wall.
- Look for
- Judge the edge of the shadow. A bright image can still be softly lit, and hard light can sit in a dark scene.
A starting prompt for this look
A small hard daylight source from camera right, crisp cap-brim and nose shadows, a fixed diagonal slash across the rear wall. Keep skin and white fabric textured.
Choose the direction, colour and contrast for your own scene. Use a clear reference and check the result through the whole shot.
The workflow starts with my filmed source, uses a Seedream 5.5 still to define the light, then tests the relight with Gemini Omni 1.2 Flash in OpenArt. These stills show the intended light. Small generated details can vary between frames.
Describe the light
you can actually see.
Start with its direction, size and distance. Add the colour and the amount of fill. Then name the visible result, such as a sharp cap-brim shadow or warm spill across a wall.
For an AI relight, use the source video for the performance and the still for the lighting. Check skin texture, eye detail, shadow direction, exposure changes and speech sync as the person moves.
High key and low key describe the tonal range. Hard and soft describe shadow edges. A high-key image can contain hard light.
Turn a lighting plan into a shot testMore light
to work with.
Use these technical names to get a conversation started. The source placement and the shadows tell you whether the look is working.
Soft light
A large apparent source gives a gradual transition into shadow. Move a diffusion frame or bounce closer to the face to increase its apparent size.
High key
Build a bright tonal range with a light background and restrained shadows. Balance key, fill and background exposure while retaining highlight detail.
Low key
Let most of the frame sit in darker tones and choose where the viewer can see detail. Control spill and fill while protecting the important highlights.
Rembrandt
Raise the key and move it sideways until the nose shadow meets the cheek shadow, leaving a small lit triangle beneath the far eye.
Butterfly / Paramount
Put the key above and near the lens axis. The nose casts a compact, roughly symmetrical shadow beneath it. Check the depth of the eye sockets.
Loop lighting
Shift a raised frontal key a little to one side. A small nose shadow reaches sideways without joining the cheek shadow.
Broad lighting
Turn the face slightly so the cheek nearest the camera receives the key. Watch the amount of illuminated skin presented to the lens.
Short lighting
Turn the face so the key lights the cheek farther from the camera. The near cheek falls darker, adding shape to the portrait.
Top light
Place the source overhead. The brow and chin cast downward shadows. Change its distance and size to control how severe the result feels.
Underlight
Put the key below the face so shadows travel upward. Its unfamiliar direction can make a simple expression feel unsettling.
Motivated practical
Use a visible lamp, screen or fire to explain the light. A hidden source can reinforce it from a matching direction and colour.
Dappled light
Break a beam with leaves or a textured gobo. Choose where the bright patches land so the pattern supports the face and background.
Negative fill
Place black fabric or a flag beside the subject to absorb reflected light. It deepens the shadow side without adding another source.
Volumetric light
Haze makes a beam visible through the air. Angle the lamp and camera so the shaft reads, then check that the effect supports the scene.
Further reading from the manufacturers teaching these techniques. ARRI Lighting Handbook, Profoto on Rembrandt and butterfly lighting.
See the plans
behind the frame.
Download my free 48-page Lighting Plans, BTS and Breakdowns PDF. It contains real film lighting diagrams, overhead plans and the decisions that shaped the finished scenes.
Look inside the PDFThe examples come from films I shot, including Underwater, The Road to Gehenna and The Farmhouse.
Take the shot
further.
Bring lighting choices into the rest of your AI filmmaking, from planning the image to building a sequence and finishing the edit.